
Wednesday, June 15, 2016

Sherry Canino!


I may have posted one or two of these beauties before, but if so, they are well worth a second dose of attention!  Artist Sherry Canino has such a vivid imagination, I can't find the words to express my admiration!  She has found a slew of ways to use my stencil Feathers 9!


Feel free to click on any of the above images to better see details!

The stencil itself looks like this --


If you're ever in the Finger Lakes area of upstate NY, you're welcome to visit Sherry's store, Canino's Artistic Café, at 106 Metropolitan Park Drive, Liverpool, NY; Sherry offers workshops too.  Liverpool is a community on the north shore of Onondaga Lake, offering a range of one-of-a-kind shops and restaurants, as well as scenic lakeshore trails. 
Thanks for visiting!

Sunday, June 12, 2016

CROP CIRCLES in the Hands of Sherry Canino and Elise Bky!


The June 2015 StencilGirl StencilClub set-of-the-month was a three-piece set, Crop Circles:


Artist Sherry Canino, is, like me, a lover of circular patterns.  She has used Crop Circles in several eye-catching artworks:


Sherry's stunning colors really dazzle the eye!

And now to introduce another artist, Elise Bky:


Above are two views of a set of art journal pages that Elise has brought delightfully to life with her unique surrealistic work. Click on them to enlarge them so you can enjoy every quirky detail!

Crop Circles can be ordered by visiting StencilGirlTalk.com and using the right side bar to become a StencilClub member. Once a member, you can purchase past-issue stencil sets at your regular membership price. Email stencilgirlproducts@gmail.com citing the month you wish to purchase; then StencilGirlProducts will provide you with a invoice through PayPal.

PS -- If you're ever in the Finger Lakes area of upstate NY, you're welcome to visit Sherry's store, Canino's Artistic Café, at 106 Metropolitan Park Drive, Liverpool, NY; Sherry offers workshops too.  Liverpool is a community on the north shore of Onondaga Lake, offering a range of one-of-a-kind shops and restaurants, as well as scenic lakeshore trails. 

Thursday, June 2, 2016

Kristie Taylor and CROP CIRCLES!


https://www.facebook.com/KristieTaylorDesigns

is where you can find artwork by Kristie Taylor, and I think you'll want to pay a visit there when you see what Kristie did with my June 2015 StencilClub stencils, Crop Circles:


Above:  a close-up showing central details; the artwork in its entirety is below.


What a great imagination this gal has! 

The 3-piece Crop Circles set looks like this:


This set from June 2015 can be ordered by visiting StencilGirlTalk.com and using the right sidebar to become a StencilClub member.   Or you can visit www.StencilGirlProducts.com, where you click PRODUCTS, on the upper left.  Near the bottom of this list you can click on StencilClub.
Once a member, you can purchase past stencils at your regular membership price.  Email stencilgirlproducts@gmail.com citing the month you wish to purchase; then StencilGirlProducts will provide you with a invoice through PayPal. 
 

Wednesday, June 1, 2016

Great Ideas from Jessica Sporn!


Fellow StencilGirlProducts designer Jessica Sporn has great advice on how to save art journal pages that are disappointing the first time around.  Check out this blog post of Jessica's --

http://jessicasporn.blogspot.com/2016/04/five-ways-to-rescue-art-journal-page.html


Friday, May 27, 2016

TANGLED PODS Paired with BOXED VINES


In an earlier post, here, I posted step-by-step photos of a technique I call "stencil-scraping."  It's the traditional dry-rubbings technique, except that sometimes I use wet media (acrylic paint) instead of the traditional dry media (soft pencil or art crayon.) 

In the second part of that post, I showed the traditional dry-rubbings method, using art crayons on thin paper atop my 9"x 12" stencil Tangled Pods.

Finally, I've used the thin papers I had printed this way -- as backgrounds in 2-part collages on greeting cards:


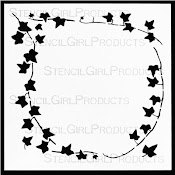
These two top embellishment-strips were cut free-hand, but, anyone can create something very similar to the top (blue) strip, just by tracing one of the vine-shapes in my 9"x 12" stencil Boxed Vines.

When line-tracing inside the openings of a stencil -- as shown in another post, here -- it's easy to make a two-for-one. 

Part one is the cut-out itself -- here I show an example.  You can think of this as the "positive."

Part two of the two-for-one is the "negative" -- that's the leftover paper from which the "positive" shape has been cut.  In the two examples above, the strip embellishments are both "negatives."

When making the cut-out, it often happens that the "leftover" paper falls into two or more pieces.  No worries.  The beauty of collage is that you can re-assemble these pieces to end up with a perfect shape, as shown above.  I like the results -- being able to see thru these negative shapes adds depth to collages.

Thanks for visiting!

Monday, May 23, 2016

STEAMPUNK Stencil (9"x12")


You can click on the image below to enlarge and better see it...


This is a collage that's going into the Canterbury Art Show (Rumson, NJ) on Labor Day weekend.  Its background was created with a Gelli Plate print on Yupo, using my stencil Steampunk, which measures 9"x12".  The stencil itself looks like this:


Thanks for visiting!

Saturday, May 21, 2016

TANGLED PODS in the Hands of Artist Jennifer Armstrong


Artist Jennifer Armstrong  has used stencils in creating this panoramic study in her moleskin art journal; her foreground was established with one of the many facial stencils designed by artist Pam Carriker.


Jennifer's foundation layer was laid down using my 9"x12" stencil Tangled Pods.  She did a beautiful job of incorporating this background with her foreground.  In the close-up below, which highlights the right half of this artwork, the stencil's imprint can be more clearly seen:   


What excites me most about this work of Jennifer's is that here she illustrates one of the main reasons I got into stencil-designing -- stencils are an easy way to create unique backgrounds that add interest, character and unity to art.  Artist Jan Sitts uses this technique, to name only one.

The stencil Tangled Pods itself looks like this:


Thanks for visiting!
 

Thursday, May 19, 2016

Lin Brandyberry!


It delights me when I see one of my stencils used -- this time, the star of the show is Lin Brandyberry, a gal who loves making greeting cards as much as I do!


These delightful cards were made with the help of my 6"x6" stencil Pressed Leaves ... and I couldn't be happier at the results Lin achieved.  Many thanks, Lin, for letting me showcase your artwork here!

Wednesday, May 18, 2016

BUDS Stencil ... in Reverse!


"Reverse-stenciling" is one name used for the technique used to make the print in today's post.  I also like to think of it as using the stencil as a stamp.

I started with my 9"x12" Buds Stencil and light modeling paste.  Using an artist's spatula -- altho an old credit card would have worked -- I spread the paste thru the stencil onto the substrate.

I was unhappy with the results of that print, so it's history.

But, while the paste was still wet, I flipped the stencil over and pressed it to a sheet of sturdy cardstock (the same way you would make a print by pressing a moistened rubber stamp to a substrate.)  Then I lifted the stencil and cleaned it.

After this reverse-print had dried, I went over it with several layers of acrylic paint.  I also used watercolor crayons, applying them dry and following this with a wash of clean water.  Between each of these applications, I rubbed the surface with a terry cloth rag.  This repeated rubbing left traces of color in some areas and removed them in others.  This worked because the reverse-stencil print had lots of ridges and valleys as result of my having used modeling paste, which is three-dimensional and, when dried, capable of taking some rough handling.

You can see these peaks and dips on the surface by clicking on the top image below to enlarge it...


The top image above is the reverse print created with my 9"x12" Buds Stencil ... and the lower image is what the stencil itself looks like.
 

Tuesday, May 17, 2016

QUILTED FLOWER GARDEN


My 6"x6" stencil Quilted Flower Garden Stencil, shown below, has been chosen by an artist friend who wants to make her own adult coloring book.  Can't wait to see the results! 


Sunday, May 15, 2016

FACETS, MIMOSA 6, BORDERS #1, BORDERS #2, TRIVET B


Last November-December, in a Jane Davies online workshop, I created a number of Gelli Plate prints which were then used in mixed-media collages.  Below are some of the results from that wonderful experience; most of these in today's post are not yet finished.


Above:  This collage is not yet finished.  In making the wide horizontal band that runs across the lower third of the piece, I used my 9"x12" stencil Facets. 


Above:  In compiling this mixed-media collage, I used my Mimosa 6 stencil -- in its 6"x6" version.  I use the 9"x12" version more often, but these artworks on printmaking paper measure only 7.5"x10".
Above:  This mixed-media collage is not yet finished.  Its vertical orange background band was created with my Borders # 1 stencil, which measures 9"x12" and contains 3 borders in all.  The stencil imprint on this vertical orange band is faint but can be seen better if you click on this image to enlarge it. 
Above:  This is one of my prints in its very early stages.  Borders # 2 was used on the far right.  Less easy to see, the left two-thirds are printed with my 6"x6" stencil Trivet B.
 
Stencils used in today's post include:
 
Facets
Mimosa 6
Borders # 2
Borders #1
Trivet B
To learn techniques we covered back in November-December, take Jane Davies' next online workshop that focuses on Gelli Plate printing.

Friday, May 13, 2016

A New Approach to Collage with QUEEN ANNE'S LACE Stencil


My April 6 post suggested cutting a stencil-print into strips that form some kind of design, then collaging the strips onto a background with space between each strip.  I've done again here, using a different cut-pattern:


This time, I chose a print I'd made with my 9"x12" stencil Queen Anne's Lace:


Try this way of creating collage -- it's a lot of fun!

Monday, May 9, 2016

Trotting Out my 6"x6" Stencil KALEID ...


Ages ago, I created this artwork on canvas board, using my 6"x6" stencil Kaleid. 


I then placed it in "temporary" storage ... whereupon it became a case of out of sight, out of mind. 
In its creation, I remember that the first few steps included using oddly-torn scraps of masking tape to tape off small elongated areas during multiple applications of acrylic paints that ranged from orange to light-to-dark pink. 
After laying that foundation, I placed my Kaleid stencil over the focal point and stipple-brushed across it with aqua acrylic paint.  My last step was to add a smear of Zinc ("mixing") White paint across the bottom of the stencil-print.  You can click on the above image to enlarge it.

On the 11th, I will have a post on StencilGirlTalk and a corresponding post here.  It will be a gap-filler idea/project for times when StencilGuts are temporarily out-of-stock at StencilGirlProducts.    

Friday, May 6, 2016

"Swatton Flowers Version 1 Stencil"


Everywhere, flowers are blooming ... and I made today's post (a birthday card) to celebrate them, using part of one of my flower stencils:

Available here:http://www.stencilgirlproducts.com/product-p/s078.htm

 To section off part of this stencil, I used masking tape, covering the areas I didn't want to print--


Above:  Click on this photo to enlarge it, to better see the area masked off.  The remainder of the stencil extends past the greeting card cover, resting under the lid of the light modeling paste (upper right corner.)

I chose to use white modeling paste, right from the jar, but had I wanted a colored paste, I would have mixed acrylic paint with the light modeling paste before spreading it over the stencil.

The greeting card blank that I chose for this project is from JamPaper.com; it's cut from sturdy cardstock deep bronze in color and "metallic" in texture.


Because this cardstock is very dark, I lined the inside of the card with lightweight paper, cut to fit.  

Above is what the inside of my card looks like, with the light paper added.

Other artists would probably skip that step and, instead, use white markers or pens to fill out the inside of these greeting cards.  

The photo below shows the final greeting card, given the final touches of glitter glue and a butterfly cut-out.


NOTE:  There is a surcharge for mailing 6"x6" envelopes.  I use two Forever postal stamps and that does the job.