
Friday, January 22, 2016

A Third Visit to the New Art Journal by Mary Ann Russo


Today's post is the third visit to a new art journal created by my friend Mary Ann Russo.  Each page of her beautiful journal is made from half of a multi-layered Gelli Plate print.  Below I'm showing the left page and right, facing, page:


Clicking on the above photo to enlarge it, you can better see the details that make this set of pages so rich and compelling.

In making these Gelli Plate prints, Mary Ann chose several stencils from www.StencilGirlProducts.com.  

The top-layer stencil that she used, with her mix of modeling paste and black acrylic paint, was my 6"x6" stencil Marbles 6.  The stencil itself looks like this:


(This stencil has a 9"x12" "big sister," Marbles 9:)


Here is another page from Mary Ann's journal:


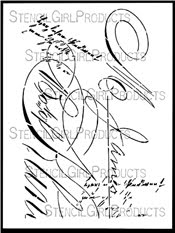
The above page -- one of my personal favorites -- was likewise made with several stencils; the white imprint on the right half was made with my 9"x12" stencil Twinship.

Mary Ann's multiple-layer printing shows how beautifully a stencil's design can improved upon when it's layered with other stencils.  The result is art that's much more eye-pleasing and complex than when any single stencil is used by itself.

More of Mary Ann's art journal pages will be posted here ... stay tuned!

Tuesday, January 19, 2016

Mixed-Media Collages with Stenciled Papers


Back in November-December, in an online workshop led by Jane Davies, I used several of my stencils in working thru the assignments.  I can't share the processes we covered in the workshop since everything was done under Jane's direction and all that how-to belongs to her.  But I will share my artworks that used stencils in their making. 

In this mixed-media collage below, the 3 rounded shapes were cut from a paper printed with my 9"x12" stencil Prayer Flags--


And preparing papers for the mixed-media collage below, I used my 6"x6" Gingko stencil as well as Swatton Borders #2--


The original stencils look like this--


Prayer Flags (9"x12")

Gingko 6 (6"x6")

More collages to be posted on another day!

Saturday, January 16, 2016

Adult Coloring Books of Your Own Creation -- with Stencils


We know that adult coloring books are big right now...wonderful for relieving stress.  

But each coloring book is produced in large numbers -- and everyone buying the same edition ends up with the same "floor plan" as everybody else who bought the same edition.

Why not turn your journal into a UNIQUE adult coloring book with stencils and Sharpie pens in black or assorted colors?


Here I've created two examples.  Below, I used one of the 3 circle stencils from the June 2015 StencilGirl StencilClub collection Crop Circles.  Above, I used two of my 9"x12" stencils,  Feathers 9 and Twinship .

Above:  This surface is stained with diluted acrylic paint.  It's now ready for the individual spaces to be filled in with color pencils.

The steps I took in making the above examples follow:


Above:  I placed a stencil atop my substrate (the cover of a greeting card blank cut from sturdy watercolor paper.)  Below:  I traced around the stencil openings with a black Sharpie:


Above:  The stencil has been lifted off the substrate.  Below:  the substrate has been covered with another stencil, Twinship:


Above:  The substrate has been freshly stained with diluted acrylic paints. When it dries, it will look like the second image at the top of this post.

I followed the same steps in making the first image at the top of this post, except that for this tracing, I omitted drawing lines thru the central figure of feathers, to make the feathers stand out better.  Rather than stain this one, I left its original background white, ready to be filled in with colored pencils.  

The possible combinations are endless! 

The two examples above fall on the crude side, but that convey the general idea.

To see a different example of using stencils to create your own coloring pages, check out Carolyn Dube here:

 The June 2015 stencils can be ordered by visiting StencilGirlTalk.com and using the right side bar to become a StencilClub member.  Once a member, you can purchase past stencils at your regular membership price.  Email stencilgirlproducts@gmail.com citing the month you wish to purchase; then StencilGirlProducts will provide you with a invoice through PayPal.


Thanks for visiting!


Friday, January 15, 2016

Another Visit to the Art Journal of Mary Ann Russo


Today's post is the second of many to show the pages of an art journal created by my friend Mary Ann Russo.  Each page of her beautiful journal is made from half of a multi-layered Gelli Plate print.  The difference between this post and my earlier post is that here I'm showing the left page and right, facing, page in one photo:


Clicking on the above photo to enlarge it, you can better see the details that make this set of pages so rich and compelling.

In making these Gelli Plate prints, Mary Ann chose several stencils from www.StencilGirlProducts.com.  

The one she used with her black paint was my 6"x6" stencil Marbles 6.  The stencil itself looks like this:


(This stencil has a 9"x12" "big sister," Marbles 9:)


Mary Ann's multiple-layer printing shows how beautifully a stencil's design can improved upon when it's layered with other stencils.  The result is art that's much more eye-pleasing and complex than when any single stencil is used by itself.

More of Mary Ann's art journal pages will be posted here ... stay tuned!

Monday, January 11, 2016

Foil Prints made with Stencils and Gelli Plate -- Continued


As a follow-up on yesterday's post, I went looking for more photos taken of prints I had made using foil of various kinds, alongside stencils and my Gelli Plate.

Here is an assortment of the commercially available foil sheets that come in printer-paper size; I probably bought them at Michaels or A C Moore:


However, for the prints shown in today's photos, I used other foils...


The three close-ups above were the result of printing on sturdy gold foil giftwrap, using my 9"x12" stencil Mimosa.

The print below was made with the same stencil but instead of sturdy giftwrap, I used giftwrap tissue, which is more flexible and gives different results:


For more on this discussion, please see the two posts preceding this one, below.

Sunday, January 10, 2016

Foiled Again...


One of today's discussions on Facebook (in the Stencil Club group) brought my attention to the fact that I had neglected to post one of my Gelli plate prints that I had done on foil laminated to paper backing.  In one of my earlier posts --

http://heartworkbycecilia.blogspot.com/2015/06/one-way-to-use-gelli-plate-prints.html
 
-- I had used one of the commercially available foil sheets that come in printing-paper size. 

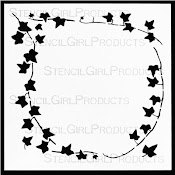
But somehow I had forgotten to post another Gelli Plate print that I did with foil and my 9"x12" stencil Boxed Vines...


I made two prints like the one above, but one has already been cut into pieces to be used in collage.  This time around, I printed on sheets of foil giftwrap which I had cut down to Gelli Plate-size.   This happened too long ago for me to remember the numbers now, but I suspect the foil giftwrap was the less expensive choice.  I used silver foil giftwrap but of course giftwrap comes in other colors.  This image doesn't capture the effect of the foil shining thru the acrylic paint, but the effect is there, when this paper is seen in person.   

Friday, January 8, 2016

PRAYER FLAGS teamed up with FACETS


From time to time, I've posted here about using paint-stained stencils as collage fodder.  Some of my stencils end up stained with multiple layers of acrylic paints; sometimes, these dried paints bear the imprints of other stencils, as well, which I think makes stained stencils even more interesting. 

Here is the Gelli Plate print that was to become the background paper in today's mixed-media collage:


Above:  Here is the matted mixed-media collage made with a Gelli Plate print of Facets, overlaid with a paint-stained Prayer Flags stencil, which is collaged onto the surface of the print, along with a few colorful papers.

Above:  a close-up of one area of this artwork.  Notice in the upper third that one of the "prayer flags" is not only paint-stained, but also textured, as result of having rested under another stencil while the two stencils were temporarily layered together while I was creating an earlier artwork.
 

Above:  another close-up; in this shot, it's somewhat easier to see the Gelli-plate print made with Facets.
The two original stencils look like this:

9"x12" stencil Facets.
Above:  9"x12" stencil Prayer Flags.
Thanks for visiting!

Tuesday, January 5, 2016

Artist Sue Knoll Hits the Ball Out of the Park ...

 
... with this use of my 9"X12" stencil Prayer Flags !  Sue worked on Yupo (a synthetic white substrate about the thickness of sturdy cardstock) using alcohol inks.  Stunning work!  
 

Monday, January 4, 2016

Introducing Mary Ann Russo's Art Journal


Today's post is the first of many to show the pages of an art journal created by my friend Mary Ann Russo.  Each page of her beautiful journal is made from half of a multi-layered Gelli Plate print.  Below, you see the left page followed by the right (facing) page.


In making these Gelli Plate prints, Mary Ann chose several stencils from www.StencilGirlProducts.com.  The one she used with her green paint was my 9"x12" stencil Twinship.  The stencil itself looks like this:

  
Mary Ann's multiple-layer printing shows how beautifully a stencil's design can improved upon, in creating art that's much more eye-pleasing and complex than when any one stencil is used by itself.

More of Mary Ann's art journal pages will be posted here ... stay tuned!

Friday, January 1, 2016

Happy New Year!


I've started my New Year creating greeting cards!


Above, I've used part of my 9"x12" stencil Queen Anne's Lace.  The technique I used has been described, step by step, here.  

When using only one section of a stencil, as I did here, and pairing it with spray watercolor, again as I did here, it's important to mask off the parts of the stencil that you don't want to print.  I use Frog masking tape for this job because it does the job yet is easy to remove. 

Since I didn't want to stop with just one greeting card ...


... I used the same technique to make the card above, with a portion of my 9"x12" Buds Stencil, shown below:


In its entirety, my 9"x12" stencil Queen Anne's Lace (used on the top greeting card) looks like this:


Thanks for visiting!