
Tuesday, July 4, 2017

Announcing--!


In case you missed yesterday's announcements --


MaryBeth will be livestreaming on Facebook on July 7 at
7 a.m. and 7 p.m. Central Standard Time.


And please check out my blog here on July 5, 6 & 7 for a special demonstration of a new-to-me way to use silhouette-style stencils!  Step-by-step photos and directions are part of the three-day package.  

To follow this blog by email, just sign on in the upper right sidebar.

Many thanks!   

Monday, July 3, 2017

JULY 7 & 8 Only -- A Sale and Livestreaming to Celebrate MaryBeth Shaw's Birthday!


MaryBeth will be livestreaming on Facebook on July 7 at
7 a.m. and 7 p.m. Central Standard Time.


And --


Yes, our beloved founder of StencilGirlProducts is having a birthday and celebrating with a sale!


This may be especially exciting for those of you who do what I do -- buy several copies of one stencil (such as Clustered Leaves, shown above) so that, with at least one of them, you can remove the rectangular outer border -- for a whole new look (and in my opinion, a more versatile stencil.)  

For stencil-altering, I use Joyce Chen scissors.  These scissors are perfect for this since they have short blades and will cut thru stencils with ease. 

Thanks for checking out my blog today!  

To follow this blog by email, just sign up for it, in the upper right sidebar.  

July 5, 6 & 7 -- Something Special Coming!


A special technique, with step-by-step photos and directions, will appear here July 5, 6 and 7.  Hope you can come visit!

Thursday, June 29, 2017

Something Special Coming July 5 - 7 !


A special technique, with step-by-step photos and directions, will appear here July 5, 6 and 7.  Hope you can come visit!

Monday, June 26, 2017

Feathers are Flying -- but in a Good Way!


Very soon after I discovered Catie Guse's artwork on the StencilGirl StencilClub Facebook page, I made another discovery -- the same Feathers 6 stencil had been used by Kreative Kymona (a beautiful young woman whose website I immediately visited.)  Her artwork, still in progress, is the focus of my post today:


This in-progress artwork is looking really promising!

The Feathers 6 stencil (6" x 6") looks like this:


Its big sister stencil, Feathers 9 (9" x 12") looks like this:


To see all my stencils, please visit here.

Thanks for stopping by today!

A special technique, with step-by-step photos and directions, will appear here July 5, 6 and 7.  Hope you can come visit!

Friday, June 23, 2017

Catie Guse and FEATHERS 6 Stencil!


Artist Catie Guse -- a.k.a. fivefingerartstudio at Instagram -- used the following StencilGirl stencils in making art shown in my post for today: 

Cecilia Swatton's Feathers 6 stencil
Rae Missigman's Travel Note stencil
Kae Pea's Wheel in the Sky stencil
Seth Apter's Text and Texture Discovery stencil


The two photos below are taken from a full-length post here, where you can find step-by-step details, alongside Catie's complete set of photos.


Photo by Catie Guse


Photo by Catie Guse


The Feathers 6 stencil (6" x 6") looks like this:


Its big sister stencil, Feathers 9 (9" x 12") looks like this:


To see all my stencils, please visit here.

My kudos and gratitude go to Catie Guse for choosing to use one of my stencils among the many StencilGirl stencils that went into the making of this artwork.  I think it's stunning, the look she achieved with pale pastels against deep black! 

A special technique, with step-by-step photos and directions, will appear here July 5, 6 and 7.  Hope you can come visit!

Thanks for your visit today!

Tuesday, June 20, 2017

Honored to Say That ...


... Chris Cozen has shown StencilGirlProducts stencils, including my 6" x 6" stencil Mimosa 6, in at least one of her recently released DVDs on painting with acrylics. 

In addition, the Summer issue of Cloth Paper Scissors magazine carries an article by Chris Cozen, in which she writes about using stencils to build composition.  I'm delighted to say that in the shot below (taken by MaryBeth Shaw) it appears Chris has opted to include, among the many beautiful StencilGirl stencil choices, either my Tangled Pods stencil or my Dangled Pods stencil.  Or possibly both.  I may know more after picking up an issue of this magazine myself.   


Tangled Pods (9" x 12") looks like this:


And the 9" x 12" stencil Dangled Pods -- which is the reverse image -- looks like this:


Thanks for your visit to my blog today!

To see my other stencils, just click here.

Saturday, June 17, 2017

July-August Issue of Somerset Studio Magazine


MaryBeth Shaw of StencilGirlProducts has a regular column in Somerset Studio magazine -- worth the cost of subscription, all by itself! 

What an honor, that in the July-August issue, among the many beautiful StencilGirl stencils used in these projects, MaryBeth chose to include an image -- shown below -- that she created with my 6" x 6" Heron stencil.  I love the way she layered complementary colors together in using another StencilGirl stencil in tandem with Heron!


The Heron stencil itself looks like this --


Be sure to catch this -- and every -- issue of Somerset Studio magazine!

If interested in seeing any of my other stencils, please visit here.

Thank you for stopping by today!

Wednesday, June 14, 2017

"Subscribe" Disabled Today But "Follow by EMail" Continues


As announced in advance, I've disabled the "Subscribe" option for this blog, but the "Follow by Email" option continues.

The "EMail" option appears in the right sidebar.


Tuesday, June 13, 2017

Anna Friesen and BLOOMING WHERE PLANTED Stencil


Today, I have the happy honor of posting gorgeous artwork by artist Ann Friesen, who did a beautiful job in her art journal using mt 9" x 12" stencil Blooming Where Planted.

The photo below shows Anna using the subtractive/reductive technique --


And the photo above is a close-up showing the stunning results achieved by Anna.

To see all of my stencils just go here.

To follow this blog, just sign up for emails on the upper right.  


A special technique, with step-by-step photos and directions, will appear here July 5, 6 and 7.  Hope you can come visit!

Sunday, June 11, 2017

Mary Ann Russo's Vintage Art Journal -- Another Page in Progress, with Another Stencil


Now to showcase artwork by other artists!  Today's featured art-maker is my friend Mary Ann Russo, who's been working on an art journal with a vintage theme.  She's been using 300-lb. watercolor papers, which she will bind together in making her own book.

Mary Ann's dimensional art, shown in two shots below, was made with Liquitex flexible modeling paste, acrylic paints and my 9" x 12" stencil Vintage Script.

The full-page spread --


A close-up: 


To see more detail, especially in the sculpted, "old-plaster" look achieved by Mary Ann, you can click on the above images to enlarge them.

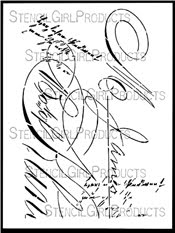
The Vintage Script stencil itself looks like this:


My thanks to Mary Ann Russo for allowing me to show her artwork here!

You can browse all my stencils, old and new, here.  

To follow this blog, just sign up for emails on the upper right. 

The "subscribe" feature, on the upper left, will be disabled June 14.

A special technique, with step-by-step photos and directions, will appear here July 5, 6 and 7.  Hope you can come visit!

Friday, June 2, 2017

Elise Bky (a.k.a. Elise Buskey) and CLUSTERED LEAVES


The stunning artwork below was done by Elise Buskey, using Tim Holtz' Oxide Inkpads with sprinkles of water --


-- and the stencil she chose was my 9" x 12" Clustered Leaves , shown in its entirety below --


(If you're like me, you'll cut off the outer rectangular border of this stencil to make its design more versatile.  Trust me, the leaves will all hang together!)

Thanks for visiting!

To browse all my stencils, please visit here.

To follow this blog, just sign up for emails on the upper right. 

I will be disabling the "subscribe" option on the upper left as of June 14.  The "Follow by Email" option will continue.

Wednesday, May 31, 2017

More SASSY SPRAY!


In following yesterday's post, today I'm posting another artwork (on a 12" x 9" gallery-wrap canvas) that I've created with the same "start-technique" mentioned yesterday.

Again, I used a pair of Sassy Spray stencils that I'd slightly altered... 


 I'm not at liberty to describe the technique that I used on this painting, since it was shown on a video that's included in the June 2015 Stencil-of-the-Month package for StencilGirls' StencilClub members.  This package can be back-ordered; directions are here. 

At this point, I'm considering this artwork finished.  Usually I take the form forward from its "start-step" but this time I decided not to.


Sassy Spray in its entirety looks like this:


To follow this blog, please use the "Follow by Email" option on the upper right.  As of June 14, the "Subscribe" option will be eliminated.

To see all of my stencils, from old to new, please visit here.


Thanks for your visit today!

Tuesday, May 30, 2017

SASSY SPRAY 6" X 6" stencil -- Reworked Art


Earlier this month, I posted an artwork I'd made on canvas using a pair of Sassy Spray stencils that I had slightly altered.  This is what the art looked like at, then:


I liked all of it except for the upper left side.  I wasn't satisfied with the focal point that I'd tried to establish there. 

So I re-worked the art.  Its new version is below --


I'm not at liberty to describe the technique that I used to start this painting, since it was shown on a video that's included in the June 2015 Stencil-of-the-Month package for StencilGirls' StencilClub members.  This package can be back-ordered; directions are here. 

But that process was only the start of this particular acrylic painting, done on 12" x 9" gallery-wrap canvas. 

After that first step, I used a variety of sizes of flat-tipped brushes to add yellow highlights in emphasizing areas of the design.  I also added a number of layers of zinc white acrylic paint to mute areas of lesser interest.  And I used a nearly-empty bottle of this paint to add a spatter in the lower middle area.

When I came back to re-work the piece, I repeated the start-technique in one area on the right side.

Then I used Gelatos.  I applied them dry, then brushed over them with liquid acrylic matte medium, to spread the color, and set it.

I also masked off a small area on the right before spattering it with the same zinc white paint that I'd used originally, in making spatters elsewhere.

Sassy Spray in its entirety looks like this:


To follow this blog, please use the "Follow by Email" option on the upper right.  As of June 14, the "Subscribe" option will be eliminated.

To see all of my stencils, from old to new, please visit here.


Thanks for your visit today!

Monday, May 29, 2017

3-Layered Stencil Print


This post focuses on multi-layering.  Today's art sample started life as a Gelli Plate print using my stencil Facets.  Altho Facets is rectangular, measuring 9"x12", the background image here is round, since I used the 8-inch round Gelli Plate.   


The middle-layer print, made with green acrylic paint and a sponge applicator, was created using one of my just-released stencils, Curls.

The top layer was made with a 4-inch-wide sponge brayer, loaded with heavy-body yellow acrylic paint, using another new 6" x 6" stencil, Lines and Squares.

The original piece of paper was cut from one of those gigantic rolls of heavy-duty paper used by contractors and other builders, as a protective cover for hallway carpeting and similar areas.  It's tough paper, meant to be walked on and abused, but the "wrong" side of this paper is smooth -- and a shade of salmon-mauve that I find attractive.  I bought my roll of this paper in a household paint supply store.

Stencils used in this post:


Curls 


Lines and Squares


Facets Stencil (9" x 12")

Thanks for stopping by!  To see all of my stencils -- new and old -- just go here.

More special ways of using stencils will be posted here -- and a very special post will appear May 23.  To follow this blog, just sign up for emails on the upper right.  


The "Subscribe" function for this blog will discontinue June 14.  The "Follow by Email" option will continue.

Sunday, May 28, 2017

More Stencil-Combo Prints Made with My Brand-New Stencils


Again today I'll post yet more stencil combinations, using the full stencils and placing them atop one another -- either directly on top, or off to one side.  I'm still making the prints with a 4-inch-wide sponge brayer loaded with heavy-body acrylic paints.  My substrates are "found" papers of various kinds. 


Above: Ski- Lift Works was the main stencil used here, on a substrate that had been previously printed with on a Gelli Plate.  On the right, I made a direct print with the stencil, using green paint.  To the left of that print, I made a "rubber stamped" print by flipping the stencil over -- while its paint was still wet -- and pressing it to the substrate.  Another layer in this multi-layered print was made with Sassy Spray.

Above:  On blueprint paper, I first printed with Sassy Spray.  The stencil I used in my top-layer print was Ski-Lift Works.
Above:  I used Sassy Spray for the top-layer (yellow) print.  I chose green paint for the bottom layer.  The stencil used there (with green paint) was Pavilion Shadows.

These 3 stencils look like this:


Ski-Lift Works 
Sassy Spray 
Pavilion Shadows

More special ways of using stencils will be posted here -- and a very special post will appear May 23.  To follow this blog, just sign up for emails on the upper right.  


The "Subscribe" option for this blog will end June 14.  The "Follow by Email" option will continue.  

To see all my stencils, old and new, just check here.

Thanks for visiting my blog!

Saturday, May 27, 2017

More Prints Made with ORNAMENTAL IRON CURLS 6" X 6" Stencil


Ornamental Iron Curls has grown into my favorite of my four May-4-released stencils!


Any questions about art samples made in these posts?  Just leave them in Comments and I'll reply!

The Ornamental Iron Curls 6x6 stencil looks like this:


Thanks for visiting my blog!

To browse all my stencils, please visit here.

To follow this blog, just sign up for emails on the upper right. 

The "Subscribe" option will be disabled June 14, but the "Follow by Email" feature will continue.

Friday, May 26, 2017

A Smorgasbord of Prints Made with My Four Newest Stencils


Variety spices life!  Today's post has a little of everything.


Ornamental Iron Curls was used to make the top layer (yellow) in the above print, done on blueprint paper.  Under that layer is an orange print created with another of my four new stencils, Sassy Spray.

Below, Sassy Spray appears in more prominent roles:


Ornamental Iron Curls was used in making the first layer in the above print, before Sassy Spray was used to make the top layer with white acrylic paint.


Above:  With Sassy Spray, I made a yellow print over multi-colored paper.


Above:  The layered print above was made with Sassy Spray and Pavilion Shadows. 

My fourth new stencil, Ski-Lift Works, was put to use in making the print below --


To follow this blog, just sign up for emails on the upper right.  


(The "subscribe" option will be eliminated June 14.  The option to follow by email will continue.) 

Thanks for visiting!

To see all my stencils, from old to new, check here.

Thursday, May 25, 2017

More Stencil-Prints? Oh Yes!


Yes, I have still more prints made with my four May 4-released stencils!


Pavilion Shadows over Ornamental Iron Curls on textured foil 

Ski-Lift Works


Ski-Lift Works 


Sassy Spray over Pavilion Shadows

Thanks for taking the time to visit my blog!

You can browse all my stencils, old and new, here.  

To follow this blog, just sign up for emails on the upper right. 

 The "Subscribe" option will be disabled June 14, but the "Follow by Email" feature will continue.