
Wednesday, May 23, 2018

May Flowers are Blooming ...


Buds is one of my 9" x 12" StencilGirl stencils designed with a floral theme.

Below are two prints I've made with this stencil.  In creating the top image, I used only a portion of the stencil.  The background here was a sheet of foreign newsprint that I had previously used in an earlier project, experimenting with the Gelli Plate.  

Likewise, the second print is on newsprint that had previously been used as a "catch-all" paper.  These are papers that I use for cleaning off my brushes before lowering them into their temporary soaking water.  For me, this is one easy way of keeping excess acrylic paint from going down the drain when it comes time to bring brushes out of their temporary soak and wash them clean at the sink.

The bonus to using "catch-all" paper for leftover paint is that I end up with interesting backgrounds for stencil prints.  A win-win.   


Above:  The Buds stencil (9" x 12")

Some of the other floral/botanical stencils I've designed include:


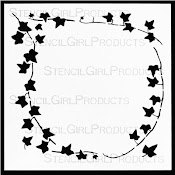
Boxed Vines (9" x 12")


Budding Branches (6" x 6")


Swatton Flowers Version 1 (6" x 6")


Silhouette of a Wildflower Bouquet (6" x 6")


Pressed Leaves (6" x 6")

Thanks for visiting my blog today!

To scroll thru the pages of all my StencilGirl stencils, please start on this page.

Sunday, May 20, 2018

Artist Amy Shawley Paquette and CLUSTERED LEAVES Stencil


Click/tap on over to this issue of StencilGirl's The Scoop -- you'll find a how-to video by Amy Shawley Paquette in an artwork that stars one of my pet-favorite stencils by Trish McKinney, Bare Branch Thicket.  

I'm delighted that Amy also chose one of my 9" x 12" stencils, Clustered Leaves,   --


The photo below is just one of many that Amy shows in this in-depth write-up for StencilTalk.


To scroll thru the multiple pages of my complete line of stencils, please visit here.

Thanks for visiting my blog today!


To see more about Amy, check out the links below --


                                Website: www.amyshawley.com


Wednesday, May 16, 2018

What to Do When a Stencil Project Goes Awry?


On a brand-new greeting card blank (JAMPaper.com), I stenciled a print using only the stencil part of my Hot Air Balloon and Mask (a set of one stencil and one mask that come together on a 6" x 6" sheet of Mylar -- as shown below:


Above:  For today's project, I used the stencil on the far left. In the center is the place where the mask sits when the stencil first arrives in your mailbox.  The figure on the right shows the mask after it's been removed from the Mylar sheet.

My print (white on blue cardstock) came out okay, but by accident I'd ruined an area beside the print, smearing it with paint.  

Normally, I cover this kind of mistake with another paint layer, or I use paper to create a collage that conceals the flub.  

This time, however, neither option appealed to me.  Nor did it work when I tried to remove the paint-smear with rubbing alcohol on a cotton swab.  (That did remove the paint, but at the same time, it left a permanent mar on the card's metallic-look surface.)

What to do?

Cut out the print and use it on a new background!

What background?

Well, I already had a 9" x 12" print made with my Facets stencil --


Above:  9" x 12" stencil Facets.

I'd made that print on multi-faceted "holographic" foil (originally sold as gift-wrap.)  It looked like this:


Above:  The "holographic" foil is very difficult to photograph because it's highly reflective -- lots of bling!

I pulled out a new greeting card blank and used a gluestick to add this print to the cover of the card.  After pressing that combination to flatten it, I cut off the excess foil, making it the same size as the greeting card.

Then I added the cut-out print I'd made with Hot Air Balloon and Mask .  I used 3-dimensional "glue dots" to give the card cover some depth.  In the photo below, this depth appears only slightly, in shadow at some edges of the cut-out print ....


I'm glad to have Hot Air Balloon and Mask because it comes in handy when I want to make a greeting card for a man.  To my eye, this image has a masculine look ... maybe because I've seen only men running these hot air balloons.  I'm sure that many women do it too, but it just happens that I haven't seen that ... yet!

Thank you for taking time to visit my blog today!

To scroll thru the pages of my StencilGirl stencils, please start here.

Sunday, May 13, 2018

For Stencil Lovers, this is a MUST-READ! Thank You, Darlene Olivia McElroy!


http://darleneoliviamcelroy.com/CrazyStencilTechniques_Artisan.pdf -- created by artist Darlene Olivia McElroy -- is a wonderful collection of stencil-using techniques.  I thought I'd seen everything and tried everything with stencils, but she bowled me over right away with her first art-making tip.  I can't wait to try it!

Darlene has honored me by including one of my 9" x 12" stencils in her art-making toolbox -- 9" x 12" Nosegay Stencil.  In its entirety, the stencil looks like this ....


The art samples below are ones I created before reading this excellent resource provided by Darlene....


In each of today's three examples, the background has been created with another 9" x 12" stencil of mine, Fantasia.  A full-size print made with this stencil is below --


Thanks for visiting my blog today!  To scroll thru the pages of my StencilGirl stencils, please start here.

Friday, May 11, 2018

MIKKI'S FLOWERS -- Flat and 3D


 Today's post starts with a greeting card; it's made with one of my April 11-launched stencils -- Mikki's Flowers Stencil (6" x 6") ....


Above:  This white-on-blue card was quick and easy to make.  I started with a 5.75" x 5.75" greeting card blank from JAMPaper.com.  (These cards have a metallic finish and come in several colors.)  With masking tape, I secured the stencil to the card.  Next, I loaded a sponge brayer with heavy-body Golden Titanium White acrylic paint, rolled the brayer over the stencil, and lifted it.  Once the paint had dried, I used glitter glue to subtly highlight each of the blooms. 

Today's next two greeting cards were also made with Mikki's Flowers Stencil but, instead of white paint, I used light modeling paste.

I could have tinted the paste with acrylic paints before using it.  This time, however, I decided to use the paste straight from the jar.  This gave me raised (3D) prints.

I cleaned my stencil immediately after using the modeling paste, since paste is a dimensional medium that can clog stencil openings if allowed to dry on the stencil.

After the paste-prints had hardened on my two greeting cards, I used blending chalks (similar to Pan Pastels) to highlight the blooms and their stems on one of the cards --


And on the other card (below), I used watercolor pencils.  After applying the pencils, I went over the flowers and stems with a very small brush dipped into water....


Thanks for visiting my blog today!

To see the two pages of my complete set of StencilGirl stencils, please check here.

Thursday, May 10, 2018

Still More MIKKI'S FLOWERS Stencil Prints


One idea leads to another; I've been on a roll with my new 6" x 6"stencil Mikki's Flowers.  New greeting cards are today's focus ....


The greeting card above shows a double-print.  First I covered an old encyclopedia page with translucent purple acrylic paint.  After that dried, I used Mikki's Flowers with a darker purple paint.  Following a little more drying time, I came back to use heavy-body white acrylic paint thru the same stencil.  Once that layer had dried, I used Pan Pastels to add color to the flowers and leaves.

For the card below, I used the same white paint and stencil to make a print atop an earlier print.  The earlier, green print had been made with another 6" x 6" stencil, Ski Lift Works.


Still using white paint and Mikki's Flowers, I made a print on an old blue monoprint.  This monoprint had a white area across the bottom; I wanted to experiment to see what it would look like to have the flower stems leading down into overall white.  After adding the monoprint to the greeting card, I decided to use glitter glue to add a wavy frame.


The greeting card above was made on a blue-to-green background paper.  After the white-painted stenciled print had dried, I used Pan Pastels to add color to the flowers.

The stencil Ski Lift Works looks like this--


Today's cards were made on greeting card blanks measuring 5 3/4" x 5 3/4".  These blanks came from JAMPaper.com, which also sells 6" x 6" envelopes.

When I first started using card blanks that worked well with my 6" x 6" stencils, white metallic card blanks of this size were available at JAMPaper.  All of their metallic blank cards (like the blue ones appearing in today's post) are beautiful, but white had been my favorite.

Now that JAMPaper no longer makes this size in white, I've decided to try white card blanks by lcipaper.com.  LCI offers two white blanks, one measuring about 5 1/2" x 5 1/2" -- a little too small to go with some of my stencils -- and 6 1/4" x 6 1/4".  They sell 6 1/2" x 6 1/2"envelopes for these cards.

Both types of cards require additional postage.  I use two first-class Forever stamps on each envelope; this does the trick.

I haven't yet received my order from LCI but I look forward to trying these new-to-me cards; they are made from 150-lb. cardstock, which will be the heaviest I've ever used.  Long ago, when I used 5" x 7" cards, they were cut from 140-lb. watercolor paper.  I like working on heavy cardstock since it can take a lot of treatments, including 3-dimensional stencil-prints made with light modeling paste.

Thanks for visiting my blog today!  More art samples made with my April 25 releases will appear here tomorrow.  To follow this blog by email, please check the option displayed above right.

To see the pages of my full line of StencilGirl stencils and masks, please go here. 

Wednesday, May 9, 2018

Ready for More PODS? -- 6"x 6" and 9" x 12" Together


On April 25, when my new stencils (and one mask) were released at StencilGirlProducts.com, I posted several art samples I'd created using these new stencils.  One of them was this --


This was created with 6" x 6" Small Dangled Pods Stencil and 9" x 12" Tangled Pods Stencil.

After looking at this piece for awhile, I decided to layer translucent zinc white acrylic paint over the bottom and far-right areas.

Next, I chose a different set of colors and used them -- with Small Tangled Pods (6"x 6") stencil -- atop what had developed so far.  

My last step was to cut apart the newly paint-stained Small Tangled Pods stencil and use two pieces as collage in two areas of the art --


I learned this technique from two other artists, Nancy Welch (reading the chapter Absentee Artist of her book Creative Paper Art) and Pat Dews (watching her DVD Designing Great Starts with Texture and Form.)

Altho I had the pleasure of meeting Pat Dews several years ago, I have not yet taken a live workshop with her.  This sad situation will be rectified in August, when she will be giving a three-day workshop in Island Heights, NJ.  Can't wait!  And I would have missed out on this opportunity if my friend Mary Ann Russo hadn't alerted me to it!

Thanks for visiting my blog today.

More art samples made with my April 25 releases will appear here tomorrow.  To follow this blog by email, please check the option displayed above right.

To see the pages of my StencilGirl stencils, please visit here.

Tuesday, May 8, 2018

More Art made with Brand-New 6" x 6" Stencils


Today's art prints feature the 6" x 6" stencil Mikki's Flowers.  All of them were made on papers previously printed with other stencils.


Above:  Mikki's Flowers Stencil and Blooming Where Planted (9" x 12") -- this print was done on holographic giftwrap.

Above:  Mikki's Flowers Stencil and Bamboo Wall (6" x 6")

 Above:  Mikki's Flowers Stencil and Blooming Where Planted (9" x 12")

Above:  Mikki's Flowers Stencil and 9" x 12" stencil Swatton Borders #2.

Above:  Mikki's Flowers Stencil  and Twinship Stencil (9" x 12".)

Each stencil that created the backgrounds above look like this in its entirety:


Twinship


Bamboo Wall (6" x 6")

9" x 12" stencil Swatton Borders #2

Blooming Where Planted (9" x 12")

Thank you for visiting here today! 

More art samples made with my April 25 releases will appear here tomorrow.  To follow this blog by email, please check the option displayed above right.

To see the pages of my newly released stencils and all earlier stencils, please check here.

Monday, May 7, 2018

More New Prints made with 6" x 6" TANGLED PODS STENCIL SMALL


Today's post features the 6" x 6" stencil Tangled Pods Small. 


Any questions?  Just leave them in the Comments and I'll reply.

Tomorrow's post will bring even more new art made with April 25 releases.  Thanks for stopping by! 

To scroll thru the pages of all my StencilGirl stencils, please start on this page.

Sunday, May 6, 2018

6" x 6" THISTLES SMALL Stencil


Small Thistles, a 6" x 6" stencil, was developed to provide a larger version of some of the stencil silhouettes that made up the big sister stencil, 9" x 12" Thistles.

The first photo below shows the stencil used "as-is" (as opposed to using it in a different way, illustrated in today's second photo.)  The background on this first art sample is a page from an old calendar.


On the artwork below, I used Small Thistles in a way that's new for me -- instead of printing the three figures side-by-side, as they appear on the stencil, I printed each of the thistles separately, placing the stencil at a tilt and lining up the stems.  Between each print, I lifted the stencil and allowed the just-made print to dry.  I used the traditional daubing technique, with heavy body acrylic paint and Sofft Art Sponge.

Another new approach, for me, was to use an Exacto knife to scrape off dried paint in some areas.  This was to help achieve a rustic look.  Also it was helpful in reducing the impression that a stencil had been used, because I scratched thru the areas on the stems and flowers where a gap appeared, due to the stencil's design.  This can be seen better by clicking on the photo below to enlarge it.


In making the print below, I went back to using the stencil as-is.  This print was made on "catch-all" paper -- the scrap paper that I use when painting; before placing my brush into a water jar, I swipe off as much excess paint as possible, onto scrap paper.  It "catches" all my excess paint, to keep wet paint from building up in the water.  This is one of the ecologically-smart ways to work toward protecting the water supply. 


One of my reasons for developing a 6" x 6" Thistles was that I still make my own greeting cards.  Below are two of them.


Above:  This card was made in two steps.  The bottom print was allowed to dry before the top print was made.


Thanks for visiting my blog today!  

To scroll thru the pages of all my StencilGirl masks and stencils, please start on this page.

Saturday, May 5, 2018

Small Pods -- DANGLED & TANGLED


It's fun to play around with stencils to see what different looks can be achieved! 

The first image below began as a print made with my 9" x 12" stencil Facets.  My next step was to use Dangled Pods Small (6" x 6") and a sponge brayer loaded with heavy-body Titan Buff acrylic paint (by Golden Paints.)  I like the complexity of this art as well as the combination of two colors that I wouldn't normally use together.  The light value of the Titan Buff sets off the dark value of the purple, and vice versa.


For the piece below, I started with a white-and-gray Gelli Plate print, also made with my 9" x 12" stencil Facets.  Over this, I placed the 6" x 6" stencil Tangled Pods Small, and applied another sponge brayer loaded with heavy-body acrylic paint in a rich gold color.  Again, I'm pleased with the way the final product shows the best of both layers.


Tangled Pods Small  also loaned itself to the making of the print below.  Its background was paper coated with blue acrylic paint that shifted from medium to light blue.


Dangled Pods Small came back into play when I made the print below.  Its substrate was a page from an old calendar.  Since the calendar photo had a striped pattern going vertically, I decided to use this stencil to create another striped pattern, this one going horizontally.  I like the play of one against the other.  I also like this calendar page and will be looking for more like it!


Today's last print was made with Tangled Pods Small and heavy-body purple paint loaded onto a sponge brayer.  Here, the background was imagery I was developing back when I created the 9" x 12" stencil Boxed Vines.  The final version of that stencil was slightly different, as shown in the image below today's last print.


The stencil Boxed Vines:


The other 9" x 12" stencil used in today's post:

Facets ...


Thanks for visiting my blog today! 

More art samples made with my April 25 releases will appear here tomorrow.  To follow this blog by email, please check the option displayed above right.

To scroll thru the pages of all my StencilGirl stencils, please start on this page.