
Wednesday, October 16, 2019

Using Paint-Stained Stencils as Collage Elements -- Part 1


Do you own a collection of beautifully stained stencils -- souvenirs from past trips into the happy land of mixed-media adventure?

Once upon a time I was reluctant to cut my own growing collection into pieces -- but I kept seeing opportunities to use these gorgeously colored designs in new ways -- so I grabbed the scissors and never looked back!  (Mind you, I've ordered replacement stencils and masks!)

Ready to read about it?  


Tangled Pods (9" x 12"), Small Tangled Pods (6" x 6") and Small Dangled Pods (6" x 6")were used not only in creating this background, but also, in two places, as collage elements (after being cut apart.)  The substrate is a 12" x 12" stretched canvas.  The technique is demonstrated as part of the May 2019 StencilGirl StencilClub package.)

6" x 6" masks Webbed Medallion and Tiger Lily were likewise used not only in creating this background, but also, in two places, as collage elements.  The substrate is a 12" x 12" stretched canvas.  The technique is demonstrated as part of the May 2019 StencilGirl StencilClub package.)

Be aware:  To use stained stencils as collage elements, I advise using sturdy substrates (for example, stretched canvas.)  This idea would not work well with thin substrates such as printer paper.

You can enlarge any of today's images, to better see details.

Usually, my paint-stained stencil and mask pieces step unto the spotlight as my last step in developing a background.  Two examples of this last-step approach are at the top of this post.  In the second example above, the masks were left in their original sizes -- being 6" x 6" masks, they were perfect for creating a quadrant design on the 12" x 12" canvas.

Other times, my stencil or masks pieces are added to an artwork as the next-to-last step, so I can add more paint (or other media) over them.  One example is below; this a close-up of an artwork-in-progress shows part of my 9" x 12" stencil Prayer Flags, adhered to the canvas before fading a bit into the background behind a coat of translucent white acrylic paint (often called "zinc white" or "mixing white.") 


Since StencilGirl creates stencils and masks using the highest-quality Mylar, I need a "glue" with enough strength to permanently keep these sturdy stencil-bits in place.  So I always use heavy-body matte gel medium to adhere stencils to my substrates.  

Painted stencils can be cut apart with scissors, or a hobby knife paired with a cutting board.  But I use Joyce Chen scissors, originally marketed as a kitchen tool for cutting apart chicken bones!  These scissors have short blades that easily make cuts in detained areas of stencil designs.  And they are sharp enough to deal with the high quality Mylar that StencilGirl uses.  


And when applying the gel medium, I work atop sheets of scratch paper, since some of the gel will end up on whatever's under the stencil-piece.


Above:  the "right" side of the stained stencil -- cut from Palm Fronds Silhouette Small (6" x 6")

Above:  the stencil piece has been flipped over to its "wrong" side.


Above:  I dip this old paintbrush (no longer used for painting) into heavy gel medium and spread the gel across the entire surface of the stencil-bit, on its "wrong" side.

The first photo below shows an artwork-in-progress.  Its background has been established with acrylic paints and collage papers.  The blue pieces of masking tape are attaching stained stencils in the places where they may, or may not, end up being added with heavy-body matte medium gel.  This step is called "auditioning."  I'm using the masking tape because I work vertically -- the stretched canvas is facing me, propped up on the shelf of an easel.  If I were working horizontally -- the way most artists do, using a tabletop -- I wouldn't need the masking tape.


Below:  A close-up of one area of this work-in-progress.  In the upper left lies part of a stained stencil that started life as my 9" x 12" stencil It's a Jungle Out There.  To its right lies a piece cut from my 9" x 12" stencil Fantasia.  In the lower left corner, there is a green-and-white stained cut-out section from my 9" x 12" stencil Prayer Flags.


Above:  If familiar with StencilGirl products, you may recognize the leafy white botanical image surrounded by reds and oranges.  This is an image I developed in Photoshop and it later became part of my 6" x 6" stencil Ferns 6.

Below is today's first example of my acrylic-and-collage art in a completed piece.


Above:  This art on canvas, entitled Meet in the Middle, was accepted into the annual Open Juried Show at the Guild of Creative Art, Shrewsbury, NJ. 

Above:  stencils used include ...

my Prayer Flags (9" x 12") 

Warped Holes 9 (9" x 12") designed by Lizzie Mayne

City Stencil (9" x 12") designed by Jamie Fingal 


Above:  part of my 9" x 12" stencil Blooming Where Planted,  stained with acrylic paints, then collaged over a background printed with my 9" x 12" stencil Prayer Flags.


In developing the artwork above, I used my stencils ...

6" x 6" Pavilion Shadows 

6" x 6" Palm Fronds Silhouette Small (also available as a 4" x 4" mini)

6" x 6" Kaleid

6" x 6" Trivet A (also available as a 9" x 12" stencil)

and the 6" x 6" stencil (borders removed) from the May 2019 StencilClub 3-piece set.

The following 2 photos show abstract compositions created on backgrounds that are fairly tame; my goal in creating them was to have the stencil-pieces and stencils star in each of the pieces:


Above: 6" x 6" Kaleid  (left) and 4" x 4" Palm Fronds Silhouette Mini (right)


Above:  orange-and-yellow pieces are cut from 6" x 6" Palm Fronds Silhouette Small  and the central purple-green stained stencil is cut from my 9" x 12" stencil Blooming Where Planted 

My next post will show more art samples created with acrylic paint-stained stencils serving as collage elements.  Thanks for stopping by here today!  To scroll thru my StencilGirl stencils and masks, please start here.  To follow this blog by email, please use that option in the upper right sidebar.

Sunday, October 13, 2019

Leaf it to StencilGirl Products!


I truly love autumn colors -- nature's confetti that falls from trees and bounce-dances with the wind across my driveway.

Leaves are all around us ... even in arid areas, some succulents sport leaves ... so common that we may tend to take them for granted.  But there is beauty in each and every unique leaf.    

And I find leaves in a lot of my StencilGirl stencils and masks.  Below is my very first try at a pour (on a 12" x 12" stretched canvas) -- and the colors came out so dismally dark that I knew I needed to go a step farther, to save it.  As Mary Beth Shaw has shown in one of her many inspirational videos*, a dark background makes a light image "pop" ... so from her I got the idea to use my 6" x 6" stencil Silhouette of a Wildflower Bouquet stencil with white acrylic paint to create the artwork below.  Is this the final version?  I'm not sure.  I may come back in to add pale tints of color to the larger areas of white.


When I designed my 9" x 12" Garden Montage stencil, which I used in making the print below, leaves combined with flowers to make overall connections within the design:


Leaves of my beloved, but now deceased, mimosa tree were the basis for both my 6" x 6" Mimosa stencil as well as its 9" x 12" Mimosa "big sister."  The next string of images was each created with these two stencils ....


Above:  printed with 6" x 6" Mimosa stencil


Above:  printed with 6" x 6" Mimosa stencil
Above:  printed with 6" x 6" Mimosa stencil, used repeatedly across the paper.


Above:  acrylic paint was added over modeling paste imprinted with both stencils used together.

Above:  both stencils were used with Golden High Flow acrylics as well as bottled spray paint.

Above:  this print was made entirely with 9" x 12" Mimosa.

And -- believe it or not! -- it was a spike-leaved plant at Longwood Gardens (Kennet Square, PA) that inspired me to design my 6" x 6" stencil Sassy Spray, which I used in making the prints below --


*One of my favorite videos by Mary Beth Shaw is here.  Great ideas for "popping" images ... and to my delight, she shows a two-page spread in her art journal that she has embellished (along the tops of the pages) with dark paint and my 6" x 6" stencil Pressed Leaves.  I really like the look when a stencil is used partially, while another part of the design "falls" off the edge of the paper.


6" x 6" stencil Pressed Leaves
  
Thank you for coming to see my blog today!  To scroll thru the pages of my StencilGirl stencils and masks, please start here. 

Wednesday, October 9, 2019

One of Many Resist Technique Approaches -- with Stencils


What is a "resist"?  The word describes an area, or areas, on a substrate (paper, canvas, etc.) that will resist coverage by acrylic paint, ink, watercolor or any other liquid medium.  

The degree of resistance varies -- with a twofold outcome.

First:  Resist-treated areas stand out from their background.

Second:  Because the degree of resistance varies, results are usually faintly tinted, with a mottled appearance; this makes for attractive details that coax a viewer's gaze to linger.

Many resist media exist -- white gesso and wax crayons, to name only two.  

But for today's post, I decided to try it with two liquid-resistant pencils.  

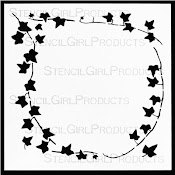
The first photo below shows a white Caran d'ache pencil, which I used to fill in leaf-shaped openings on my 9" x 12" stencil Ivy Frame.  My substrate was a sturdy sheet of white paper.  (You can click on each of today's images for enlargement, to better see details.)


Below:  With the same stencil, on a new sheet of sturdy paper, I used a white grease pencil.  These are also called China markers and the brand I happened to buy was Phano.  If you click on the photo below, to enlarge it, you can easily see that the pigment stick broke.  I was bearing down too hard!


After filling in a number of the ivy leaves, I poured some black gesso into a disposable foam plate and got out an old credit card.  I dipped the card into the pool of gesso, then scraped the card across my substrate, as shown below.


Close-ups are below --


Above:  grease pencil as a resist.


Above:  grease pencil as a resist.


Above:  grease pencil as a resist.


Above:  Caran d'ache as a resist.


Above:  Caran d'ache as a resist

Ivy Frame comes in two sizes, the size used today (9" x 12") --


-- and the 6" x 6" Ivy Frame 6 Stencil, which looks like this --


To scroll thru the pages of my StencilGirl stencils and masks, please start here.

Thanks for stopping by this blog today!  If you'd like to follow it by email, just sign up in the upper right sidebar.

Sunday, October 6, 2019

Artwork in Progress


In the mood to launch a new idea, I got out a brand-new stretched canvas and drew a random series of shapes with brushes dipped into black acrylic paint.

Once that paint had dried, I used blue masking tape to cover 3 areas of the canvas with three stencils -- my 9" x 12" Facets, the 6" x 6" stencil from the May 2019 StencilClub set and my 9" x 12" stencil Fantasia.  To better see the placement of these stencils, click on the image below to enlarge it ....


After lifting off the stencils, I had created what you see below:


Notice (above) that, with each stencil, I used only some of the stencil openings.

As each layer of paint dried, I re-used the stencils, placing them in a variety of positions, building up layers.


9" x 12" Facets stencil
9" x 12" stencil Fantasia


Used in this project:  the 6" x 6" stencil shown in the lower right above.  This set is available here.

This project is ongoing.  More black lines are coming!

Thanks for visiting here today!  To scroll thru the pages of my StencilGirl stencils and masks, please start here.

Thursday, October 3, 2019

Spotlight on StencilGirl Artists!


My hearty thanks goes to photographer/artist Kim Ross; she receives the credit for today's first photo, as well as the art it contains.   Kim used StencilGirl "StencilGuts" in making the artwork labeled "epic."  These "StencilGuts" were created in StencilGirl's manufacture of my 6" x 6" stencil Osprey Wings.


6" x 6" stencil Osprey Wings


In the lower left of the photo above, Kim has crafted an artwork using another 6" x 6" stencil of mine, Cats.


6" x 6" stencil Cats

Thank you, Kim Ross!

And a warm thanks to artist Martie Rowen, who used my 6" x 6" Heron stencil in this eye-catching art journal spread --


What delights me most about this art of Martie's, is the fact that she embellished the heron's silhouetted shape, developing realistic-looking feathers, eyes, etc.  The stencil itself looks like this --


6" x 6" Heron stencil 

I thank Martie sincerely for reminding me, and everyone else, of the value of thinking outside the box -- or in this case, outside the outlines of a silhouette stencil!  And for allowing me to show her art here.

Shifting gears ...

You can click on the image below to better see three prints (all in one photo) in gorgeous earthtones, all courtesy of artist Heather Baley.  She made the prints using my 9" x 12" Longwood Florals Mask, shown partially at the right of Heather's photo. 


Longwood Florals Mask was designed to be used "right-side-up" -- as shown in Heather's photo above -- or "upside-down," as shown below.  In fact, if memory serves me correctly, the plant that inspired this mask was actually growing in the direction shown below!  Heather Baley, thanks so much for allowing me to show your artwork and your photo here!


Longwood Florals Mask (9" x 12")


Longwood Florals Mask was also chosen by Ju Misty, another artist/member of StencilGirl StencilClub, when she created a sequence of three Gelli Plate prints, which she has graciously allowed me to share here --


Above:  Ju Misty created this 3-dimensional print following a tutorial previously posted in my blog; that tutorial can be reached here. A similar tutorial can be reached here.

 Ju Misty, I thank you sincerely!

Last, but far from least, a thank-you goes to fellow StencilGirl designer Carolyn Dube, for the art shown below.


Today's final photo, above, was developed during an art retreat -- delightfully entitled Dancing with Your Muse -- facilitated by Carolyn Dube.  One of the workshop participants, an artist named Chris, gets the credit for this exciting pair of orange, yellow and white prints, and the stencil she used was my 9" x 12" Prayer Flags, shown below:


9" x 12" stencil Prayer Flags

The 2019 Dancing with the Muse art retreat has ended, but you can catch glimpses of it here -- and by scrolling down to the end of that post of Carolyn Dube's, you can learn how to get in on the ground floor for next year's retreat.

Thanks, Carolyn Dube, for letting me use a photo from your fun retreat!

And a thank-you to you, for having come to check out my blog today!  To scroll thru the pages of my StencilGirl stencils and masks, please start here.

Monday, September 30, 2019

A Video by Sherry Canino!


Leaves!  Is anything prettier in autumn? 


I’m thrilled and honored that, among many other StencilGirl stencils and masks that Sherry Canino chose for one of her  art-making adventures, she included my 9” x 12” stencil Clustered Leaves (see the far left and the far right, above.) She has been generous in allowing me to use her video --


Many thanks, Sherry, for letting me post your work here!

And thank you too to visitors at my blog today!  To scroll thru the pages of my StencilGirl stencils and masks, please start here.